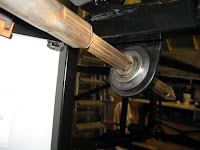
I will start with the steering column. A surface dusting of powder rust was easily removed with some emery paper. I thought about a coat a black paint, but the clearance of the nylon bush is too fine, so I will leave it as it is.
The next job was to change the barrel lock. On the face of it quite a simple job: drill out the lug and out it pops!! But what I have learned is that this seems only to be the case if you have the old keys. There is a circlip at the base of the lock inside the casing. If you can turn the lock such that the circlip aligns nicely with the barrel, then it will just pop out. If you can't then you will probably have to resort to removing the head of the old barrel and turning the circlip with a screwdriver, as I had to.

Attaching the new steering wheel boss was quite straight forward as was the installation of the lower bush - the spring clip is not shown as I know I will need to remove the steering shaft again at some point to fit the panels

The steering rack was next. Not difficult to place or bracket up, but there is something not quite right. With the rack in place and the linkage connected, the steering column is half an inch above the mounting brackets. Next time I go to GBS I will take a look at some factory built cars. I am also not happy with the U clamp on the steering rack. Again I will check with GBS.


No comments:
Post a Comment