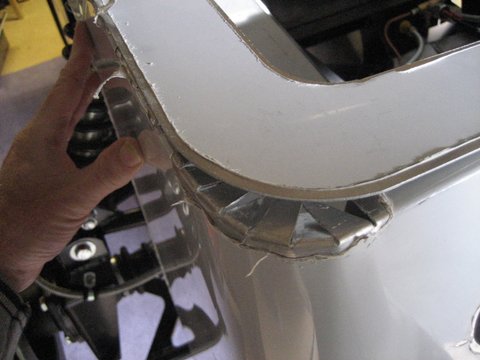
I've been thinking about the fit of the back panel on and off all week - something wasn't right. Took another look this morning and again, there was definitely something amiss. In order to get the side panels (over the shocks) to line up, even roughly under force was very difficult.
So spent an hour with a fresh ground coffee and a laptop scouring blogs. A number of the recent and well illustrated blogs are for the GT chassis which has a different arrangement of panels at the back. But then I found it..... and it was (as usual with these things) as obvious as the worry lines on my forehead. The two stays linking the roll-bar to the back-panel were neither level nor the correct hight above the rear chassis. As I don't know what the correct height is, I adjusted them (brute force) bending them upwards slightly each time, keeping them level until the back panel fitted properly. Much better now. So much so I have started to drill the rivet holes for the final fixing.
 I did get distracted at one point when I noted the proximity of the fuel tank to the mounting points for the rear warning lights. Would there be sufficient room for a rivnut? So before I permanently riveted and bonded anything I widened the mounting holes to 9mm and popped some rivnuts in. Then I needed to cut down the rear cases on the lamps for IVA before I could check that they all fitted together without snagging on the tank. I took 8mm of the back of the lamps with a fine toothed hack saw and used some IVA trim to tidy up. They now fit at 90 degrees to the road.
My work and home life have limited progress this week. Maybe I will book a week off soon and make some progress.
I did get distracted at one point when I noted the proximity of the fuel tank to the mounting points for the rear warning lights. Would there be sufficient room for a rivnut? So before I permanently riveted and bonded anything I widened the mounting holes to 9mm and popped some rivnuts in. Then I needed to cut down the rear cases on the lamps for IVA before I could check that they all fitted together without snagging on the tank. I took 8mm of the back of the lamps with a fine toothed hack saw and used some IVA trim to tidy up. They now fit at 90 degrees to the road.
My work and home life have limited progress this week. Maybe I will book a week off soon and make some progress.
So, where next?
- I can continue building the rear of the car right up to rear lights.
- I can make a start on the engine and gearbox prep
As I have found so far, some jobs can be done to a point and then have to stop to wait for something, like a tap or a washer or just inspiration. So I think I will just continue down both avenues in parallel. That way if one stalls I can make progress on the other.
In order to start on the engine it needs to be moved and that involves moving the car first and dropping it down to axle stands. I need to source the axle stands first.
So, on with the rear. The fuel tank sender is the next job. Having marked up the position for the pilot holes for the self tappers, I drilled 3.2mm holes and tried valiantly to catch the swarf before it disappeared into the fuel tank. I then swilled out the tank with some fresh fuel before coating the gasket with some Locktite 5922 and putting it all together. Left it to harden off.
While the car is still at a comfortable working height, I thought I would position the seat runners ( and it was a good excuse to see the seats in the car for the first time).

 It is difficult to mark positions on the black powder coat, so the first step was to cover the floor with paper and then mark the position on the runners on the paper. As each runner has a nyloc between it and the floor, I used some waste wood as a spacer, which also prevented any scratches. 8mm holes drilled, I decided to mount the seat runners upside down on the base of the seats. Structurally I couldn't see any reason why not, and the fixing bolts are much easier to get at this way around. As the seats are coming out again to fit the internal panels etc I used standard nuts rather than the nylocs.
 There doesn't seem to be much tolerance between the seat edges and the side panels / central tunnel - snug. I may have to alter the seat runners slightly once all the panels are on.
No progress on the build this weekend. A new addition to the family has occupied all available time today.
I did manage a great day at Donnington Park yesterday though. There were many Zeros on show both on the GBS stand and also in the RHOCar enclosure. Managed to speak to a number of Zero builders, all keen to explain the hows and whys. I really do like this aspect of kit car building.
You may have seen from earlier posts that I have been trying to decide how I should finish the exterior of my car. I decided this weekend thanks to the Donnington show. I spoke with 2 owners who had polished their aluminium panels, and was able to see the end result and talk to them about how it was achieved. I learned that Auto Glym Metal Polish is the stuff to use. Having tried it today I agree. It doesn't produce the mirror effect I came close to with specialist metal polishes and power tools, but occupies an understated middle ground between high polish and the brushed matt. The problem I had with the high sheen was three fold: firstly it was very effort intensive; secondly it would be difficult to get a consistent finish across such a large area; and finally it would never be a stainless steel finish, so it would always look like a scratched version of stainless to the novice eye. Decision made.
I also picked up a battery isolation switch from the show. I am not looking to install it so that I can go racing, but as a security feature under the dash somewhere.


 I did get distracted at one point when I noted the proximity of the fuel tank to the mounting points for the rear warning lights. Would there be sufficient room for a rivnut? So before I permanently riveted and bonded anything I widened the mounting holes to 9mm and popped some rivnuts in. Then I needed to cut down the rear cases on the lamps for IVA before I could check that they all fitted together without snagging on the tank. I took 8mm of the back of the lamps with a fine toothed hack saw and used some IVA trim to tidy up. They now fit at 90 degrees to the road.